
I have just had the most fabulous three days. I have been learning to dress-make. Well, re-learning really. I used to make clothes when I was in my teens and early 20’s. Then I got busy in corporate life and didn’t make the time. I love clothes and find the construction fascinating. It made me realize that we often put up with imperfections in our clothing because they are the closest we can get with off-the-peg outfits. The magic of hand-made is that they can fit your form perfectly – no compromise necessary at all.
I spent the weekend with the lovely Kate Davies – she has her own wonderful blog – www.fabrickated.com The intention was to make a wrap dress using Vogue pattern V8379 which Kate has already constructed several times before.
I started by selecting fabric in preparation for my trip – that’s not so easy! I went to 5 different shops to find what I was looking for. I was looking for something cool and bright. Not easy to find during the winter when most fabrics are deep and muted! I eventually settled on a cool pink that is slightly deeper than I would have liked, but it works and was the best of the selection available. I was looking for jersey and there are so many choices – mixes of polyester, elastane, viscose, silk and bamboo. Of course, the man-made options are much cheaper and for a first attempt was probably where I should have pitched it. The choices on offer were not great in terms of colour, so I pushed the boat out and went for a bamboo (95%) and elastane (5%). It is a lovely firm jersey – some of the alternatives were just too flimsy and upon being stretched, did not spring back into shape well. Had I chosen them, I would have had a nice bottom shape in the dress after sitting down for half an hour – not that attractive, although cheaper. I decided on balance, that I would rather pay a bit more and be able to wear the finished product, rather than go for a cheaper option and not really want to wear it. I was also pretty confident that with Kate’s help I’d be able to have a pretty decent bash at it and I always find that if I start out assuming that I am going to succeed, I definitely stand more of a chance of success!
The revelation to me was that we started by taking all of my measurements, comparing them to the standard ones on the pattern and then adjusting it to fit me completely. Quite obvious when you think about it, no wonder my teenage attempts at trousers cut straight from the pattern were disastrous really! We discovered that I am fairly close to off-the-peg, except for a couple of adjustments that were a few inches different – fairly significant and explains why off-the-peg fits in some brands and not in others.
We pinned the pattern and then started cutting out – fairly scary. At this point there is no going back! My cutting skills need to be sharpened up, but it became easier the more I did, guided by the ever skillful Kate.
The sewing was great fun – it’s so quick. I realized that the preparation, in terms of good planning of where to pin the pattern pieces to get the most out of the fabric, creating marks on the fabric to show where things such as darts, pleats, centre back and front, are really quite important and make for a better finished garment. I made a few mistakes on the machining – catching fabric from behind where it should not have been and getting too quick and sewing wonky lines to name a few!
My favourite gadget was the overlocker. It gives a really professional finish. It is unforgiving through, as it cuts off the excess fabric and stitches at the same time – so no room for error at all. I quite liked this and was happy to take the risk, given the alternative of double stitching, which, for a beginner is also quite tricky. The objective is to sew two parallel lines – keeping them even and straight. This seemed like a bigger challenge than overlocking. I did try both and noticed that where there was the opportunity to try it twice, my second attempt was always better.
The pattern we used was deemed to be ‘very easy’ by the manufacturer. I realized that they actually assume a high degree of prior knowledge. Many of the instructions are brief and not explicit enough, despite my previous experience, albeit a long time ago. My machine skills stood me in good stead, I have at least made curtains and blinds in the last decade, so I remembered how to sew. It was more about being reminded of the pattern markings and interpreting their brief instructions. I am sure there would have been much more unpicking if I had been left to my own devices! The beauty of it was that Kate has at least three of these dresses in her wardrobe, so we were able to look at the finished garment, so I could see what I was aiming for.

Here I am basting the interfacing to the collar and neck of the dress.
This was another important lesson. Previously, as a complete amateur, I would have pinned, then sewed. Kate taught me the importance of basting – this is a long running stitch that holds the two pieces of fabric together, allowing the pins to be removed. It really holds the pieces together much better and avoids any damage to the machine by sewing over pins inadvertently. It gives a much better finished item and a step very well worth adding.

Look at that concentration! I loved Kate’s sewing corner – it’s a really inspirational place to be, with everything I needed close to hand – including Kate’s wonderful husband who kept us fed and watered all weekend! It was like ‘Sewing Bee’ meets ‘Master Chef’!

I couldn’t believe how quickly the dress came together in the end. We seemed to be working on it piece by piece and suddenly to whole dress came together. I am delighted with the finished dress – it fits perfectly. Here is the top half – the bottom still had tailor’s tacks in it, so the full-length dress picture is me back at home after a good press.

How satisfying it is to make something from scratch. I shall definitely be dusting off my machine and maybe even signing up for some classes to learn more. Now I have a perfectly fitting dress, I’m not sure I want to compromise with shop bought.
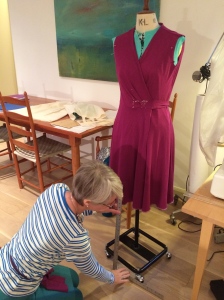
Thank you Kate for teaching me so much. Here she is showing me how to measure the hem from the floor up to get an accurate hem all the way around.
